+86-13901441113


Choosing an Outdoor Play Structure can feel simple until you compare footprints, materials, age ranges, and safety details. A bright tower may look perfect in a catalog, yet leave too little room for swings to move freely. Measure the yard before you shop. Notice slopes, low branches, gates, and the path children use to reach the play area. Small details matter.
The best choice fits the children who will use it and the space they have today. It should also leave room for changing abilities and interests. Check the manufacturer’s age guidance, weight limits, anchoring instructions, and recommended clearance zones. Look closely at railings, seams, fasteners, and surfaces where rain may collect. These checks cannot guarantee that every play session will be risk-free, but they help families make more informed decisions. Supervision and regular inspections still matter.
Budget is part of the picture, too. The lowest price may not include installation, protective surfacing, or replacement parts. A larger structure is not automatically better. Sometimes a compact climbing frame gets more use than an elaborate set that crowds the lawn. Be honest about maintenance: wood may need periodic care, while other materials can fade or wear. No option stays perfect forever. The following seven tips explore how to compare safety, durability, design, and value, so you can choose a structure that suits your yard and your family—not just the product photos.
Tip: Match the structure to children’s ages, but consider more than the age label. A preschooler may need low steps, wide platforms, and easy-to-grip rails. Older children often enjoy climbing routes, balance challenges, and taller slides. Check the manufacturer’s age guidance and measure the available space before choosing. Children develop at different speeds. One size rarely fits everyone.
Tip: Watch how the children actually play. Do they invent stories, race between activities, or spend ten minutes digging in one spot? A play structure with a small clubhouse may suit pretend play, while a climbing wall can appeal to energetic children. Ask what they would use, then compare their answers with what you see outdoors. Preferences change, sometimes quickly.
Tip: Consider different abilities, confidence levels, and ways to join in. Steps should feel manageable, and a quiet platform can give a cautious child time to observe before climbing. If siblings share the structure, look for varied activities rather than one feature that dominates play. Leave clear space around entrances and exits, and choose a stable, age-appropriate design. I have seen plans lean too heavily on a child’s current favorite; that can miss what they may enjoy next year. Think about supervision, too, since children’s play needs and comfort can shift from day to day.
Before choosing an outdoor play structure, measure the usable area—not just the flat patch where it might stand. Include the equipment’s footprint, access paths, and the clear space children need around moving parts. The U.S. Consumer Product Safety Commission’s Public Playground Safety Handbook recommends a use zone extending at least 6 feet around many stationary play structures. For swings, it recommends clear space in front and behind equal to twice the height of the pivot point. These are useful planning benchmarks, though the handbook addresses public playgrounds; check the equipment maker’s instructions for a home installation.
Then assess the ground. Look for slopes, soft spots, tree roots, drainage channels, and overhead branches. A sunny lawn can become muddy after rain. A level-looking area may still tilt, so check it with a long level before installation. Note fences, walls, and windows too; a tape measure cannot reveal every hazard. Leave room for children to move without colliding with hard surfaces. Keep a little extra space if you can. It is easy to measure the structure and forget the swinging arc—or the route needed to carry parts into the yard. Record dimensions and site conditions before shopping, then compare them with the structure’s stated footprint and clearance requirements. Sources: U.S. Consumer Product Safety Commission, Public Playground Safety Handbook; equipment manufacturer installation guidance.
Sample site dimensions compared with a planning envelope that allows 6 feet of clearance on each side.
Example only: For a 40 × 30 ft area and a 20 × 15 ft structure footprint, the planning envelope is 32 × 27 ft with 6 ft added on every side. Confirm the required use zone for the specific equipment and check slope, drainage, and underground utilities before installation.
Choosing an outdoor play structure starts with the space you have. Measure the usable area, including room around swings and slides. A compact climbing dome suits a smaller yard, while a multi-level tower may need more clearance. Check the ground slope and nearby branches, too. They are easy to overlook.
Compare structure types by the play they encourage. Swing sets support repeated movement; climbing frames build grip and coordination. Towers with slides invite imaginative games, but can take up more room. Mixed-use structures offer variety, though extra features may go unused. Think about the children’s ages and abilities, not just the number of attachments. Their interests change.
Materials affect upkeep and comfort. Treated wood has a natural look, but inspect it for splinters, loose fasteners, and weather wear. Metal frames are often sturdy; in direct sun, surfaces may become hot. Plastic components can feel smooth and need less routine care, but check for fading or cracks. Touch the surfaces on a warm afternoon. That detail matters. Compare weight limits, anchoring instructions, and recommended fall-zone surfacing in the manufacturer’s documentation. I once assumed a level-looking patch was ready for installation; a simple ground check would have shown otherwise. Choose features that fit your yard, then verify the site before assembly.
A safe outdoor play structure should feel solid before children climb it. Grip each post and push gently from several directions. The frame should not rock, twist, or lift at its feet. Check that anchors sit firmly in the ground and that bolts, chains, and connectors show no sharp edges or visible wear. Stability is easy to overlook when a structure looks sturdy in a product photo.
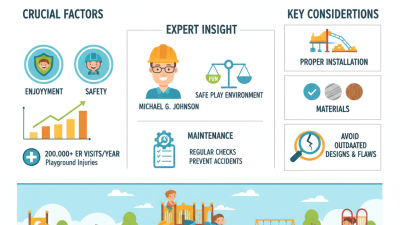
Use recognized safety guidance, not appearance alone. The U.S. Consumer Product Safety Commission’s Public Playground Safety Handbook recommends protective surfacing beneath and around equipment, with depth matched to the material and potential fall height. The Centers for Disease Control and Prevention reports that more than 200,000 children aged 14 and younger are treated in U.S. emergency departments for playground-related injuries each year. That figure makes fall zones worth measuring carefully. Keep them clear of fences, tree roots, paving, and stored toys.
Accessibility matters too. The U.S. Access Board’s playground guidelines address accessible routes and usable play components; look for a firm, continuous path to the play area, manageable entry points, and options children can use in different ways. A wide ramp is helpful, but it does not solve every access barrier. Check turning space, transfer areas, and reach to interactive features. Bring a tape measure. Then test the route with the actual mobility device or stroller, if possible. I’ve learned that a small lip at the entrance can matter more than a glossy feature list.
Choosing an outdoor play structure starts with the ground, not the slide. Measure the full use zone, including space for swings to move and children to land. The U.S. Consumer Product Safety Commission’s Public Playground Safety Handbook explains that protective surfacing and fall height matter when reducing injury risks. Its injury data also show why surfacing deserves a real budget line, not leftover funds. A few inches of mulch can look adequate but settle unevenly after rain.
Installation costs include more than delivery. Check access for trucks, drainage, underground utilities, and whether the site needs grading. Ask contractors to itemize labor, anchoring, surfacing, and inspections. Get the site assessed before ordering. Otherwise, a tight gate or sloped yard can turn a planned installation into an expensive surprise. I once underestimated how much space a swing needs; the drawing looked fine, the yard did not.
Plan for maintenance while comparing options. The National Recreation and Park Association’s maintenance guidance emphasizes routine inspections and timely repairs for park assets. Use that principle at home: inspect bolts, connectors, moving parts, and surfacing at set intervals, especially after storms. Keep a small repair reserve. Wood may need sealing, while metal components can develop worn coatings or corrosion. Record what you check and when. It feels fussy, but a simple log can reveal recurring problems before they grow.